New and exciting! Better than housework! Every Friday I will be posting a super-easy quickie. No, not THAT kind of quickie. Get your mind out of the gutter. But you may have enough time left over for that, if you wish. Your business. Not that kind of blog. Simple stuff taking less than an hour, but still impressively cute. There ain't nothing like making something start to finish. Or getting to use the word ain't. It just feels good. And I promise there won't be a huge narrative to wade through...like this. So I'll shut up and put up. Here we go.

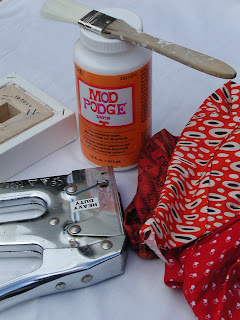
Get it:
- Small canvases, any size. I used these 4" squares because they came in a pack o'nine. Nice.
- Nail gun
- Mod Podge or something like that
- Brush..well, you're not gonna use your fingers, right?
- Fabric scraps and a piece large enough to wrap around the whole thing
- Center canvas on larger fabric piece, making sure it's large enough to make it to the back on all sides.
- Pull and staple the first edge. Fold corners in hospital-like, making it super tight. Cut off excess and hammer in the staples to make them flatter, if necessary.


- Coat the front and sides with Mod Podge. While it's drying, cut out your fabric to make a little vignette. It's fun to customize it for someone. This one with the nesting birds is for a housewarming gift.
- Mod Podge pieces and slap 'em on. Coat again until it's saturated and all the wrinkles/bubbles are gone. You can seal the whole thing again later with another coat if you want.
- Finish the back by hot-gluing a piece of paper cut with those paper edgers left over from your scrapbooking phase. Try to cover the staples, but don't stress over it. See, I've got one sticking out.
- Attach a loop or sawtooth hanger from the hardware store. So handy to have around. There you go. Collage. You be done.
Happy weekend.


14 comments:
this is really awesome Lauren!
I'm going to link back to this one on my blog. Love it!
so cute, thanks for sharing!
That is fabulous and I will totally do it - my 12 year old crafting goddess-in-training will particularly dig it.
Also this portion of the instructions:
"Finish the back by hot-gluing a piece of paper cut with those paper edgers left over from your scrapbooking phase."
...made me almost shoot coffee through my nose, because in fact I have about 8 pair of these, left overs indeed of my short but intense affair with scrapbooking. :)
I saw something somewhat similar on Martha Stewart recently. I have been wanting to do this and saw it featured on the craftzine blog. Now I will subscribe your blog! I have been making fabric pendants lately too!
Hey Lauren, I caught your tutorial in the Craftzine blog.
Way to go! I love tutorials!
Cheers,
Yoli
Great tutorial for a great idea!
Lauren, you're so funny! Love the post and love the tutorial even more!
Great tutorial! Found your blog via roxycraft. I don't have modpog so using fusable webbing is a great alternative. Just do all the ironing and/or stitching for applicas first then staple or glue to canvas. WaaLaa!
What a great tutorial! Can't wait to do mine. Love your blog!
Thanks for the tutorial. I love your writing style too.
thx heaps for the tutorial. i have made a couple of 4x4 fabric canvases with fishies but they are no where near as tidy as yours.
scrapbook-crazy.com -all about the mini album
my blog - Crazy bout mini albums :)
Hey Lauren,
Thanks for making this seem less intimidating. Currently I have at least 100 quarter flats that were bought for some project or other and this tutorial got me off my "artist's block". Bigger thanks go to you for not speaking over my head with directions and supplies. Your "real people" attitude was a more than welcome read!! Can't wait to see and hear more from you!
oh I love this! Thanks!!!!!
Nike Air Max 90
Wholesale Nike Shoes
Christian Louboutin Boots
Sexy High Heels
Christian Louboutin High heels
Yves Saint Laurent High heels
Tory Burch High heels
Christian Louboutin High Heel
Post a Comment